There is no best time to do yoga. You can do it any time of the day and will receive all the wonderful benefits of yoga, regardless of the time of the day you practice it. However, there are numerous reasons to practice yoga in the morning to really reap its many health benefits. Doing yoga every morning soon after getting out of bed is a great way to increase flexibility and movement into your body after sleeping. Moreover, working yoga into your morning routine will also improve your energy levels, curtail stress and anxiety, and help in weight management.
How does morning yoga benefit your health?
- Morning yoga helps instill stillness and calmness that can lead to happiness.
- Doing yoga in the morning can bolster your emotional health as it boosts your mood.
- A little morning yoga routine can help stave off cravings for bad food.
- Enhances your sleep and helps in regulating brain activity.
- Improves your alertness.
- Enhances your stamina and endurance.
- Reduces your stress levels and overall well-being.
- Gives an extra boost to your metabolism.
- Doing certain twisting poses in the morning stimulates your digestive system.
- Improves your lung function. When you combine your movement with your breath your lungs function in a better manner.
- Decreases stress and anxiety.
- Protects you against inflammatory diseases.
- Improves circulation and heart health.
Below are given some yoga poses that can help you gently shake off sleep and feel more energetic.
1. Plank Pose (Phalakasana)
Plank Pose is an arm-balancing yoga pose that helps build strength and stamina. It looks like a high push-up position and is well known for strengthening the core.
Instructions
- Lie down on your stomach.
- Bring your palms under your shoulders and tuck your toes.
- Inhale and lift your upper body and knees. Bring your torso forward until your shoulders are directly over your wrist.
- Keep your legs straight. Do not bend your knees.
- Tuck your tail bone under so that your hips, legs, and upper body are in one straight line.
- Hold the position for at least 10 to 15 breaths.
- To release the pose, lower your knees to the floor and rest in the Child’s pose.
Tips
- Beginners can build strength by practicing half plank with their knees on the floor.
- Engage the thigh muscles to develop the abdominal strength you need for the plank pose.
- Do not let your hips sag too low or go up too high. Keep your body from head to shoulders to heels in one straight line.
- Do not lock your elbows, instead keep a slight bend in them to avoid any injury.
Benefits
- Helps develop a stronger and tighter stomach by working all the muscles of the core.
- Super effective in losing belly fat.
- Improves your posture, endurance, and determination.
2. Triangle Pose (Trikonasana)
The Triangle Pose is a deep stretch for the groins, hips, and hamstrings. The pose improves your overall balance and stability, both physically and mentally.
Instructions
- Start by standing on the mat with your feet hip-distance apart and arms beside you.
- Now step your feet apart about 4 to 5 feet.
- Turn your right foot 90 degrees so that your toes point towards the top of the mat. Position your left foot at 45 degrees. Make sure your heels are aligned with each other.
- Raise your arms to shoulder level, parallel to the mat, so that they form a T shape.
- Exhale and start leaning your torso over your right leg without bending or curving your back and keeping your legs straight. Roll your ribcage open towards the ceiling. Lower your right hand towards your right shin/ankle/toes/ floor inside or outside the right foot. Reach your left hand towards the ceiling, keeping your gaze on the left hand. Keep your left arm in line with the shoulders. Hold for 5 to 10 breaths or longer if possible.
- To release, inhale, press through your left heel as you rise, and bring your arms down and feet together.
- Repeat on the other side.
Tips
- Keep your core engaged and extend your spine.
- If it is uncomfortable to gaze at the top of your hand, look down.
- Do not curve your back.
- You should soften the front knee slightly so that your hamstrings get a good stretch but at the same time you don’t put pressure on your knee joints.
- Check your hip alignment. Your hip should not jut out to the side. If that happens bring your hip back toward the midline.
- If you think you are losing your balance shorten your stance by bringing in your back leg closer.
- If you have tight hamstrings or feel tightness in your hips then place a block behind your front leg and rest your bottom hand on the block.
- Do not practice this pose if you have hip, knee, or ankle injuries or if you suffer from balance or standing issues, have low blood pressure, headache, or diarrhea.
Benefits
- It also helps to reduce the fat from the tummy.
- The pose improves digestion due to its twisting motion.
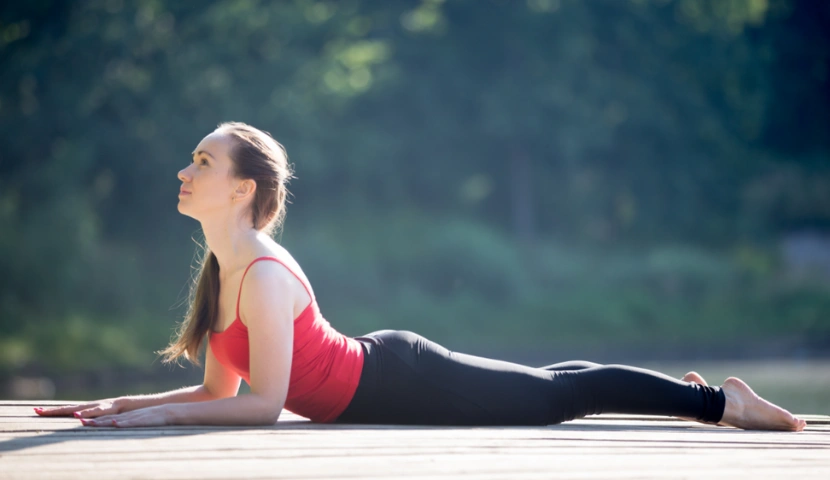
3. Sphinx Pose (Salambha Bhujangasana)
Sphinx pose is a powerful pose to lengthen and strengthen your back and can also prepare you for deeper backbends. The pose opens the chest, lungs, and lower back. In addition, Sphinx Pose is a variation of the Cobra Pose and is a perfect alternative for people with wrist pain or carpal tunnel, as it is done on the forearms.
Instructions
- Lie down on your chest with the legs extended behind you. Keep your feet together.
- Bring your forearms in front, parallel to each other with elbows under the shoulder. Rotate your thighs inward. This will help lengthen and extend your lower back to protect it.
- Press the tops of your feet firmly into the floor.
- Inhale, press firmly into your palms, and lift your upper torso.
- Press your pubic bone down into the floor.
- Take your head back into a slight backend or keep your gaze in front. Keep pulling your torso back with the help of your arms. Extend your tailbone toward your heels. Stay in the position for a few breaths.
- Exhale and gently lower your torso and head to the floor. Rest with your head turned to one side.
Tips
- If you experience any pain in your back or neck, then only lift your chest as far as is possible for you without any pain.
- To lift your chest higher, engage your legs, and press down through your pubic bone.
- While doing the pose, always try to extend and lift and not bend.
Benefits
- This is an excellent warm up pose for beginners.
- Stretches your spine.
- Opens up your shoulders and chest area.
- Alleviates your stress and stimulates your abdominal organs.
4. Cat and Cow Pose (Marjariasana and Bitilasana)
The Cat Pose is often paired with the Cow Pose to stretch the body, bring warmth, and make the spine flexible. This combination of poses relieves back and neck pain after a long day at work.
Instructions
- Start with your hands and knees on the floor. Make sure your wrists are directly under your shoulders and knees under your hips. Your knees should be hip-width apart.
- Start with a neutral spine position with your back flat.
- Inhale and as you exhale round your back. Imagine you are pulling your spine towards the ceiling.
- Engage your abs and bring your chin towards the chest. Tuck in your tailbone and drop your head. The pose will look like a cat stretching its back.
- Now move into the Cow Pose by inhaling and arching your back. Lift your head and tailbone and gaze in front or towards the ceiling. This pose should look like the shape of a cow.
- Flow continuously back and forth from Cat to Cow Pose, connecting your breath with your movement. Inhale and do the Cow Pose and exhale and practice Cat Pose. Repeat this 10 to 15 times.
- To relax, sit on your heels with your spine straight.
Tips
- If your wrists hurt, you can do the pose on your forearms.
- Beginners can also put a blanket under their knees in case their knees hurt.
- While doing the Cat Pose, do not try to force your chin to touch the chest.
- Make sure you coordinate your breath with the movements.
- When doing the Cow Pose, start the pose to flow from the tailbone to the neck and head.
Benefits
- Strengthens and stretches your spine and neck.
- Stimulates your abdominal organs.
- Relieves stress and calms the mind.
- Improves your balance and posture.
5. Downward Facing Dog
Regular practice of this asana stimulates digestion by improving blood flow in your abdominal organs and relaxing the GI tract.
Instructions
- Stand on the mat, inhale and come to your hands and knees or the table position. Make sure you have your wrist underneath your shoulders and hips above your knees.
- Now bring your hands slightly forward and spread out your fingers.
- Tuck your toes under, inhale, and as you exhale lift your knees off the floor. Engage your lower belly and draw the navel to the spine. Slowly begin to straighten your legs and do not lock your knees.
- Pressing through your hands, lift your buttocks back and up so that your body is in an upside-down V pose.
- Maintain length in your spine and keep lifting through your pelvis.
- Press down equally through your hands and heels. Draw your shoulder blades towards your tailbone and broaden across your collarbones.
- Rotate your thighs inwards and your arms externally. Relax your neck and gaze towards your feet.
- Stay for 5 to 10 breaths.
- To come out of the pose, bring your knees back to the floor and return to the initial all fours position.
Tips
- Bend the knees slightly to prevent injury.
- Do not round your spine and continue maintaining length in your spine.
- You can practice the pose against the wall also. Stand facing the wall with approximately 3 meters of distance. Now place your hands on the wall and start walking your hands down until your torso and arms are parallel to the floor.
- Do not practice the pose if you have a wrist or shoulder injury or suffer from high blood pressure. You can modify the pose by resting your head on a blanket or bolster.
Benefits
- Stretches your hamstrings, calves, and ankles.
- Helps you build strength in your shoulders and arms.
- Improves blood circulation.
6. Happy Baby Pose (Balasana)
Happy Baby Pose is a soothing pose that increases relaxation and stretches your body. The pose can also stretch your lower back and hips.
Instructions
- Lie flat on your back. Inhale and as you exhale, bend your knees into your stomach.
- Inhale and grab the outsides or top of your feet with your hands. Ensure your ankles are directly over your knees and try to bring them towards your armpits.
- Flex your feet and keep them facing the ceiling. Hold the pose for a few breaths. You can also roll from side to side.
- To release, exhale and bring your arms and legs to the floor.
Tips
- If you can’t hold your feet easily with your hands, try holding them with yoga straps wrapped around both feet.
- For a deeper stretch, let the legs open a bit wider.
- Do not practice this pose if you have a chronic injury or inflammation in the legs, neck, or shoulders.
- Keep your shoulders on the floor all the time. Instead of raising your shoulders to reach your inside or outside of the feet, you can hold your shins or ankles.
- Your head should also stay on the mat to avoid neck strain. If this is not possible, then keep a rolled towel underneath your neck for support.
Benefits
- Brings a gentle awareness to the hip joints and opens the hips.
- Stretches the spine, hamstrings, and inner groins.
- Helps relieve stress and fatigue.
- Reduces lower back pain.
7. Chair Pose (Utkatasana)
Chair Pose improves balance, stamina and strengthens your legs, back, and shoulders.
Instructions
- Stand straight with your feet hip-width apart and your arms to your sides.
- Inhale and take your arms over your head next to your ears and stretch them straight.
- Keep your spine neutral and shoulders down.
- Exhale, bend your knees and bring your thighs as parallel to the floor as possible. Shift your weight into the heels and keep pushing down your pelvis as if you are sitting on a chair. Lean your torso forward and keep your chest slightly lifted.
- Keep your lower back long and draw your tail bone down. Dip your chin slightly down and relax the muscles of the face and jaw.
- To release the pose, inhale and lengthen your legs, exhale and bring your arms down by your sides.
- Relax.
Tips
- If you are a beginner place your hands on your knees or practice the pose against the wall with your back a few inches away from the wall. So, as you bend into the pose, your tail bone should slightly touch the wall.
- If you can’t hold your arms overhead, then extend them forward at shoulder height instead.
Benefits
- Stretches your chest and shoulders.
- Strengthens spine, thighs, calves, and ankles.
- Stimulates abdominal organs.
8. Warrior II (Virabhadrasana II)
Warrior II is a standing yoga pose and is named after the Hindu mythological warrior Virabhadra. The pose can also help you build a feeling of inner strength and power.
Instructions
- Start by standing facing the length of the mat with feet together.
- Exhale and spread your feet apart approximately 3 to 4 feet or depending upon the length of your legs and openness in your hips. Keep your heels in line.
- Turn your right foot so that it is parallel to the mat and move your left foot slightly to help you find stability and balance.
- Now keeping your balance, slowly raise your arms to the sides with palms facing down. Make sure your arms are in line with your shoulders.
- Turn your head towards your right hand and look at your right hand.
- Exhale and bend your right leg. Press firmly into your right foot.
- Extend your spine, relax your shoulders, and push your chest out.
- Stay in this position, breathing normally for a few seconds.
- To release the pose, inhale, and as you exhale, come back to the starting position with feet together.
- Repeat the pose on the other side.
Tips
- You can use a chair to support the thigh of the front leg by putting a chair under your front bent leg.
- Practice the pose against the wall behind the back for alignment of shoulders and hips.
- Keep your stance short if you have tight hips.
- Make sure that your front knee is directly over your front ankle, as this can strain the knee joint.
- Keep your hands on your hips if you have a shoulder injury or if you do not have a strong upper body.
- Focus on a single point.
Benefits
- Stretches the chest, shoulders, and groin.
- Strengthens the ankles and legs.
- Improves stamina and balance
- Stimulates abdominal organs.
9. Warrior I (Virabhadrasana I)
Virabhadrasana 1, is a powerful standing pose that can help you develop stamina, balance, and coordination. The pose also helps your mind become focussed, calm, and clear.
Instructions
- Stand in mountain pose. With an exhale step your feet about 4 to 5 feet apart. Turn your right foot out 90 degrees, keeping your toes pointing to the top of the mat.
- Turn your left heel in at about 45 degrees and keep your left leg straight behind you.
- Exhale, bend your right knee over your right ankle and turn your torso to the right.
- Now raise your arms straight above your head. You can keep your arms parallel or press your palms together.
- Keep your shoulders down and away from your ears.
- Lift your chin to look at your hands overhead. Hold the pose for a few breaths.
- To come out of the pose, press your weight through the back heel and straighten your right leg. Bring down your arms. Now turn to the left, reversing the position of your feet, and repeat on the opposite side for the same amount of time.
Tips
- Widen your stance for greater stability.
- To avoid tilting your pelvis forward, and curving your back, keep length in your lower back by drawing your ribs in and scooping your tailbone forward.
- If you are a beginner you can keep your hands at your heart center or on your hips.
Benefits
- Improves your balance and posture.
- Opens the chest and shoulders.
- Stretches and strengthens the thigh muscles, calves, ankles, and feet.
10. Camel Pose (Ushtrasana)
Camel pose is chest-opener and can improve your immune system considerably. It is a great choice for improving circulation, warmth, and digestion and can also remove fatigue. The asana can also alleviate a foggy mind, bloating, and constipation.
Instructions
- Come down to your knees, keeping your legs hip-width apart.
- Keep your feet flat. Press down with the top of your feet and shins into the mat.
- Place your hands on your hips and turn your thighs inward. Keep your hips directly over your knees.
- Inhale and engage your lower belly and lengthen your tailbone down toward the floor.
- Exhale, lift your torso, pushing your hips down, and start leaning back. Turn your arms outward, and do not squeeze your shoulder blades. If you are a beginner, keep your hands at the back of the pelvis.
- Allow your head to drop back without any straining.
- If you are comfortable in this position, you can deepen the pose by trying to hold your heels.
- To come back, bring your hands back to your hips. Lift your torso back up by pushing your hips down and slowly bring your head up.
Tips
- If you can’t grasp your heels, you can tuck your toes to give your heels a lift.
- You can also use blocks on both sides and rest your hands on them.
- If you want to deepen the pose, you can also try holding opposite ankles by crossing your forearms.
- Keep your pelvis stable and lengthen your sternum toward the sky.
- Keep your neck comfortable throughout the pose.
- To keep your thighs, hips, and pelvis aligned, practice the pose facing the wall. As you lean back with your thighs touching the wall, press your pelvis against the wall. Keep your thighs close to the wall even if it gets difficult to touch your heels.
- You can also place a cushion or a folded blanket under your knees to easily get into the pose.
Modifications
- Thumbs on the sacrum and toes tucked under
- Pressing thighs against the wall
Benefits
- Stretches chest, abdomen, and quadriceps.
- Improves core strength and spinal flexibility.
- Creates space in your lungs increasing breathing capacity.
- Stimulates the kidneys which improves digestion.
The Takeaway
Finally, make yoga a part of your morning routine and feel the difference it makes to your day. Doing yoga in the morning will boost mental clarity and relaxation and make your body a more physically comfortable place to live in! If you are not a morning person, it may sound impossible to enjoy a wake-up-yoga session to start your day, however, once you get used to it, you can’t imagine life any other way!